Tuesday, August 30, 2022

August Paper Pumpkin - Sweet Sunflowers

            To say that this August Sweet Sunflowers kit is amazing would be an understatement.  This kit is sooooo pretty, and you can make sooooo many cards from this one kit!  The cards are beautiful, the die cuts are perfect, and the envelopes are gorgeous, they give you enough of the beautiful printed paper to make another 10+ cards.  They are so pretty I don't even want to put a sentiment on the front of some of these.  I still have a ton of supplies left to make more cards!


        These Paper Pumpkin Kits just keep getting better and more amazing every month.  I can't wait to see the next three months, as they will be the the holiday kits!  Even you have not subscribed yet, be sure that you do by September 10th to get the Halloween kit.   
There are 2 options for purchasing the kits:
1) Subscribe month to month, paying the full price every month fore the kit, or 
2) Purchase a prepaid subscription for 1,3, 6, or 12 months, and receive the kits at a discounted price!.
Both options give you the ability to skip any month that you don't want to receive a kit.
Every month you will receive and email that will give you general info about the upcoming kit, what kind of kit (cards or treat boxes or other) to help you decide if you want that kit.  You have until the 10th of every month to choose to opt out for the month.  
If you are interested in the month to month subscription, here is the link.
If you want to know about the pre-paid subscription, follow this link to my on-line store and click on the menu / all / kits-Paper Pumpkin and then Prepaid Subscriptions. 
Any questions, please let me know.

To Order Stampin' Up! Products On-Line 24/7, CLICK HERE!

Still catching up - July Paper Pumpkin

        The July Paper Pumpkin, Sending Good Thoughts, was another amazing kit!  It is so easy to create beautiful, impressive cards with these kits with very little effort.  I loved everything about this kit, from the seagulls to the bottles with a message inside, to the ship in the bottle.  So much fun!

For info on subscribing to Paper Pumpkin please visit my online store and go to Kits - Paper Pumpkin


To Order Stampin' Up! Products On-Line 24/7, CLICK HERE!

June Paper Pumpkin Pick of the Crop

        The June Paper Pumpkin was so pretty, and offered a lot of different options for making cards.  Here are a few that I made.  I just loved the pink striped envelopes, they were perfect for using on the cards! For info on the Paper Pumpkin Subscriptions and different options, please go to my online store and then select Kits - Paper Pumpkin.


To Order Stampin' Up! Products On-Line 24/7, CLICK HERE!

Thursday, August 11, 2022

Spooky Treats by Paper Pumpkin

Get your Halloween crafting on with the Spooky Treats Paper Pumpkin Kit. This month’s kit includes everything you need to make 18 absolutely adorable (and just the right amount of spooky) treat boxes—that’s 6 each of 3 unique designs! No need to let the season creep up on you; subscribe and order your kit today.

Plus, we’re putting the TREAT in trick-or-treat with a special GIVEAWAY on social media starting 5 September at 9:00am (MT)! Simply follow @PaperPumpkin on Instagram or the Paper Pumpkin page on Facebook, like either post, and mention three friends in the comments for your chance to win one of two personalized JBL speakers. You’ll have to be quick because the giveaway closes 8 September at 4:00pm (MT). Don’t miss out on this fang-tastic opportunity! 


To Order Stampin' Up! Products On-Line 24/7, CLICK HERE!

Wednesday, August 10, 2022

Another Round for Brewed For You

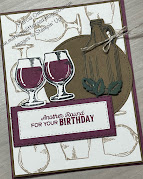
        The Brewed for You Bundle is so much fun, you have so many options for tailoring a card to a specific person or event.  This card is for a wine drinking friend, rather than the beer drinking friend that I showed the other day.  

        I used the Wine Glass stamp from the set to make my background, then stamped and die cut the wine glasses and the jug, cut a few leaves from the dies, cut a circle with the Stitched Shapes Framelets dies and the sentiment tags from the Stitched Rectangles Dies, took some glue and dimensionals and stuck everything together.


To Order Stampin' Up! Products On-Line 24/7, CLICK HERE!

Thursday, August 4, 2022

Brewed For You!

Here is "another round" of cards that can be used for the guys in your life - AND the gals too!
This is the Brewed For You Bundle, which includes the Brewed For You stamp set and the Brewed Dies, when purchased as a bundle, you save 10%!  I wasn't going to get this set, then I realized that it was the perfect set for soooooo many of my friends and family! 

Brewed For You Bundle 159093  $37.75

        This set features all kinds of adult beverages, beer, ale, wine, with or without a foamy head!
The beer card I used double mats on the card front, with some black twine in-between.  I used a little color on the foam with the blending brushes and also added Wink of Stella (141897) to the glassware to give it a little shine, and added the little die cut of what I believe is hops.  
        For the Wine card I created my own background paper by stamping the wine glass multiple times with Crumb Cake ink,  The tray and bottle are in Soft Suede, and I used Rich Razzleberry for the wine and card base.  I added a few grape leaves to the tray, which I cut with one of the Layering Circle dies (151770.  Added my sentiment, which I stamped and framed on the Stitched Rectangle dies (151820). Done and ready for the mail!


To Order Stampin' Up! Products On-Line 24/7, CLICK HERE!

Craft For A Cause

Food scarcity is an issue facing communities across the globe.
    Each year, Stampin’ Up! supports a designated cause through special limited-edition products or promotions.
    This Year we have chosen to support organizations that are working to end food insecurity by releasing a special Nourish and Flourish Kit (item 160230). And with your help, we hope to make a difference. This great Philanthropic kit will be available through January 4, 2023.
    With every Nourish & Flourish kit purchased by you, we’re donating $3 to organizations fighting to end food scarcity.
    it includes 9 embossed card bases—3 each in 3 designs—and 9 coordinating envelopes, sticker sheets, die cuts, and die-cut labels. And, it includes an insulated 9" x 6-1/2" x 6-1/4" (22.9 x 16.5 x 15.9 cm) lunch bag (so pretty)! Please note: this kit does NOT include a stamp set or ink spot like many of our kits. It has sentiments already printed, and die cuts to add to your cards. You can, of course, use any and all supplies that you already have to add your own style to these cards.
Remember, together we can do so much more than we can do alone.

To Order Stampin' Up! Products On-Line 24/7, CLICK HERE!

Sending Smiles to Everyone!

    Today's selection from the 2022-23 Annual Catalog is the Sending Smiles Bundle, which includes the Sending Smiles Stamp set and the Sending Dies at a 10% discount when you purchase the bundle (#158707).  
    This is another quick and easy set to use, with a lot of different combinations to create a variety of cards.  One thing that I really like about this set is that there a a lot of different sentiments, and you can pick and choose what you really want to say.  I just stamped a couple of different sentiments, and then cut the words apart to make the combos I wanted for each card. 

    The card on the left has an embossed card front, and the flowers and large SENDING are stamped on Basic White cardstock and cut with the dies.  I used dimensional for everything except the stem/leaf die cuts, they are glue directly to the card front. 
    On the second card I created a panel on the front, instead of a full card front, and added a piece of ribbon to dress it up a little.  I cut a circle from Basic White with the Layering Circle Dies (151770), stamped the flowers on scrap Basic White Cardstock and cut them out with the matching die, added a little extra color to the petals with the Stampin' Blends, then stamped the stem/leaf directly on the circle.  I the added the flowers with dimensionals, and again pieced together the sentiments I wanted on this card.  Two completely different looks from the same set.  


To Order Stampin' Up! Products On-Line 24/7, CLICK HERE!

He's The Man - and he needs some cards!

        Today I am showing a terrific Suite of products for all the cards you need to create for the men in your life.  This is the He's The Man Suite Collection, which includes the He's All That stamp set, the All That Dies set, He's The Man Designer Series Paper (DSP), and the Rustic Metallic Adhesive dots.  
        This is conveniently bundled into one item number if you want the whole Suite of Products: 159083.  Or, of course you can pick and choose which parts you want and order individually
        The Designer Paper is amazing, you get 12 sheets of 12x12 paper, 5 double sided designs.  You also get 2 sheets of die cuts (shown on the pic above. You can make an (almost) endless number of cards and probably never have to make a duplicate, the possibilities are so many!

Here are 2 that I made, same exact layout, but completely different feel to both cards.  


    To make, start with a card base 6 1/2 x 5 1/2, and score at 2 1/4, fold towards the inside.  
Cut another piece of cardstock the same color 3 1/2 x 3 1/2, and score one side at 3/4.  
Cut a piece of the DSP of your choice 5 1/4 x 2, and then choose a complementary piece of DSP and cut to 3 1/4 x 2 1/2. Glue the larger DSP onto the outside of the card base.  Fold the smaller cardstock piece where you scored it, and glue the second DSP piece to the main body of that piece.
    From the dies set, select the little die that looks like 2 banners stuck together (it will cut out 2 separate pieces).  Decide if you want to stamp the sentiment or use one of the die cut pieces for your front.  Whatever you choose, cut 
a piece of cardstock with the die that matches the shape of your sentiment to use on the inside to cover the place where you stuck the sentiment on the front.  You may have to hand cut this piece if you use a die cut piece that does not have a matching die.   Glue the 2 banners onto the DSP Side of the smaller cardstock piece, arranging so they stick out far enough to glue your sentiment and backing onto the ends, add you adhesive dots as shown.  Once that is done, take that cardstock piece and you can either glue the folded edge to the BACK of the card, or to make it cleaner looking, you can glue it to the inside right edge of the card, and then cover it with you inside white piece of cardstock.  Quick and easy, and so many different combos you can make.  I will have other examples in the coming weeks using this set, as I need lots of male cards.  


To Order Stampin' Up! Products On-Line 24/7, CLICK HERE!

Wednesday, August 3, 2022

Let's Set Sail


This is another of my favorites from the 2022-23 Annual Catalog that is perfect for the summer months, and is also quick and easy to make a fabulous card.  Here are a couple of examples that will take you just a few minutes to put together.
                     #157906   $32.25

These cards both use the Let's Set Sail Bundle (stamp set and coordinating Sailboat Builder Punch), Cardstock base of your color choice, die or embossing folder for the card front layer.  

For the top card I used the Deckled rectangle dies (159173) for the card front/  I stamped the long water stamp on the card front, stamped the sails on a scrap of white cardstock and punched with the Sailboat Punch, then punched the sailboat with the punch our if Crumb Cake cardstock, glued them on the card front, stamped some birds and the sentiment.  Done!  The bottom one I cut a circle with one of the Layering Circle dies (151770), it's about 3" diameter, used the long water stamp and just inked the middle of it and stamped 2-3 times with Starry Sky ink for the sea, and with Balmy Blue a couple of time for the sky, making it look kind of weathered.  I stamped the sails in Soft Suede on white cardstock, punched them out, then punched out the sailboat in Basic Black, glued the sails on the boat, added a tiny little flag at the top in Daffodil Yellow, put the sailboat on the circle with dimensionals.  I had used the Timeworn Type Embossing Folder (156505) for the white card front and glued it to the card base. I took a couple of scraps of Crumb Cake cardstock and crumpled them, added them to the card front.  I used the Cloud Punch (157749) and a white scrap to make the cloud, stamped it with birds, glued it to the card, the stuck the circle sailboat piece on with dimensionals.  I added the sentiment on Starry Sky cardstock, (same as the card base) and embossed the sentiment with white embossing powder.  You will need to add a white piece inside the card with your sentiment, décor stamp, etc.  Have fun!


To Order Stampin' Up! Products On-Line 24/7, CLICK HERE!

It is only August!

    Sometimes we get so excited by all the new products and ideas for the holidays that we forget that we also need to go back and create for the everyday events that go on in our lives.  
    If you are not ready to start your holiday cards (like me) but want to craft, need to replenish your stock of cards for all occasions, then let's go back to the 2022-23 Annual Catalog for some fun! 
    I am working my way through all my current stamp sets from the Annual catalog, and will be showing a different set every day, with several ideas for each set. All these card layouts  can be changed up to use the  paper and stamps that you have, to suit the occasion that you need a card for.  Or, if you want to make it like I did, I will provide all the info you need for that process also.  Have fun, enjoy the summer that we still have before the Holidays are upon us.  I will also be throwing in a few holiday cards occasionally just to remind you that you need to be at least thinking of your plans for Holiday cards.  Enjoy!

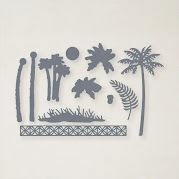
Paradise Palms is one of my favorite stamp & die bundles, and I have showed several cards using that set before.  But, this is such a quick and easy card, sometime you need something in a hurry, plus it looks more complicated than it is.  

        This card starts with your basic 8 1/2 x 5 1/2 card base in Highland Heather, then I cut a one in Basic Black 4 x 5 1/4, and then my card fromt of Basic White 3 7/8 x 5 1/8. You will also need some extra Basic Black for the tree and grass die cuts.  
        Ink is Highland Heather, Flirty Flamingo and So Saffron.  For the tag I used Versamark and embossed with white embossing powder (you need a heat gun), but you can also stamp your sentiment directly on the card front. 
        You also need the Blending Brushes to apply the ink. If you don't have them, you could use a sponge, but will not get quite the same effect.  They are sold in a set of 3.
        Start with your white card front, place it on a piece of computer paper so you can test your blending brush).  Lightly rub your blending brush on the Highland Heather ink pad.  Then, starting on the computer paper, swirl the brush a little before swirling it onto the top third of the card front.  Start with light coverage, as you can continue to add more until you get the coverage you want, but you can't take it off if you start too heavy.  Next, do the same to add the Flirty Flamingo ink and then the So Saffron.  Use a different brush for each color.
        Next, get out your dies for the grass and the large palm tree.  Cut one of the grass and 2 of the tall palm trees from your Basic Black Cardstock, and glue them to your card front.     Either make a sentiment tag or stamp your sentiment directly on the card front.  
     Use your adhesive of choice to attach the card front to Basic Black layer, and the use dimensionals to attach to the card base.  
        You will need a piece of Basic White for the inside of the card, and you can ad a stamp of your choice for the sentiment inside, and don't forget to add a decorative palm tree or frond stamp on the inside also.
It actually took me longer to type up these directions than it took me to make the whole card!

Supplies:
    Paradise Palms Stamp Set     157716        $23
    Palms Dies                              157718        $35
    Highland Heather Cardstock   146986       $9.25    
    Basic Black Cardstock             121045       $10.25
    Basic White Cardstock             159276       $10.25
    Highland Heather Ink pad        147103       $8
    Flirty Flaming Ink pad               147052       $8
    So Saffron Ink pad                    105118       $8 
    Blending Brushes (3)                153611       $12.50
NOTE: You can make this card using any colors you like together, so you may not have to purchase much to re-create this.  Have fun!

 
To Order Stampin' Up! Products On-Line 24/7, CLICK HERE!

Cozy & Bright - New Holiday Kit!

        Celebrate the season with a card kit that has everything you need to wish those you love a merry Christmas and a joyous New Year. Don’t let the holidays overwhelm you–get your all-inclusive kit and make quick multiples everyone will love!  I love the sentiments with this kit.  This is available now to order, and comes with everything you need to create 12 beautiful cards, including envelopes.  Item #160338, $22.00.  That's only $1.83 per card!  

    While you are on my online store site, look at the other new kits that have been added, there are so many fun choices!

Kit Includes:

  • Cozy & Bright Photopolymer Stamp Set
  • Acrylic Stamp Block
  • Classic Stampin’ Spot: Poppy Parade
  • Predesigned projects 
  • Step-by-step instructions
  • Precut pieces (No prep work! Get right to crafting). Including printed die-cut sheets: sticker adhesive sheets & non-adhesive sheets
  • Makes 12 cards of 1 design
  • Gold foil accents
  • Folded card size: 5-1/2" x 4-1/4" (14 x 10.8 cm)
  • 12 preprinted envelopes
  • Enough adhesive to complete projects
  • Linen thread
  • A 9-7/8" x 6-1/2" x 2-3/4" (25.1 x 16.5 x 7 cm) printed designer box for storage or crafting on the go
  • Product colors: Cajun Craze, Early Espresso, Evening Evergreen, Garden Green, Poppy Parade, Pumpkin Pie


To Order Stampin' Up! Products On-Line 24/7, CLICK HERE!

Sale-a-bration additions!

       There are even more products now available to shop, earn, and redeem during Sale-A-Bration. 
A couple of items have sold out completely and are no longer available, so Stampin' Up! has given us a bunch more products to choose from.  
        Sold out are are Pool Party and Soft Seafoam note cards, and the Tree Lot Dies. 
Here are all the new additional items you can choose from, plus the remaining ones in the brochure. 


To Order Stampin' Up! Products On-Line 24/7, CLICK HERE!